One of the essential documents needed for your passport, visa and ID card is a professional passport photo. Up until now, booking an expensive appointment with a photographer or finding a nearby photo booth was nothing out of the ordinary. Nowadays, however, waiting in a queue or trying to get a good time slot is a thing of the past! Numerous photo websites can help you get your passport photo online yourself that meets all the official passport photo requirements stated by the government, while profiting from the same quality you’d get from a photographer. So stay with us for some step-for-step instructions on how to take your very own professional passport photo using an online tool.
Table of Contents
Online passport photo software
Online tools are your best bet for taking a passport photo on your own, and with the myriad of tools to choose from, it’s no wonder if it all seems a little overwhelming. It’s a great option though if you’re in a rush and want to save time and money. If you opt for using an online tool, the process of taking a passport photo at home involves 3 simple steps:
- Take your passport photo using a digital camera or your smartphone.
- Choose an online tool you wish to upload your photo to.
- Print your passport photos.
Passport photo software options
Websites you can upload your passport photos to include, but are not limited to 123PassportPhoto, Visafoto, Passport Photo Creator, IDPhotoDIY and Passport Photo Online.
Before we delve into the process of how to take a passport photo though, let’s familiarize ourselves with the passport photo requirements.
- How Can I Convert My Photo to Passport Size for Free?
- Where to Take Passport Photos Online?
- Is There a Free Passport Photo App?
- What’s the Best Passport Photo Maker?
- Creating Lightroom Passport Photo – DIY
- How to Make a Passport Photo in Photoshop – Tutorial
- Online Passport Photo Softwares Review: Visafoto vs. PhotoAiD
- U.S. Passport Photo in GIMP: How To Make One?

Requirements for passport photos in the US
The acceptance of your passport photo by the U.S. passport agency depends heavily on whether it meets all the official requirements. Therefore, it’s vital to always keep these in mind when taking a picture. Check out the list below to get a clearer image of what the requirements for your passport photos are:
- The photo needs to have been taken within the last 6 months.
- The correct photo dimensions are two inches by two inches.
- Don’t smile- keep a neutral facial expression.
- The photo requires a white or an off-white background.
- Open eyes and closed mouth are obligatory.
- The applicant is required to look directly into the camera.
- Photos need to be taken in full-frontal view.
- The photo needs to be printed on high-quality photo paper.
- Uniforms are not allowed on passport photos.
- Only high-quality photos are accepted.
- Your neck and shoulders must be visible.
- Head coverings hiding your hair are only allowed to be worn for religious reasons. The head covering may not, however, cast any shadows on your face or obscure facial features.
- Your head should take up about 1- 1 3/8 inches, or 50% to about 70% of the complete image.
- Wear clothes in the photo you wear daily.
- Earphones, headphones, jewellery and similar accessories obscuring parts of your face are forbidden. Objects worn for medical reasons like hearing devices are allowed.
- Glasses cannot be worn on passport photos unless there are underlying medical reasons (e.g. an operation, high sensitivity to light etc.). If medical reasons exist, the applicant must have a signed medical statement from a professional. The glasses should not obscure the applicant’s eyes or reflect the light.
What should I wear on a passport photo?
So, now that you are familiar with the requirements, you might be wondering what to wear on your passport photo. In general, you can choose whatever you feel comfortable in and wear on a daily basis. The only piece of clothing prohibited on passport photos are uniforms, glasses not worn for medical reasons and headwear like hats, scarves or headbands. If you have religious reasons for covering your hair and can provide a letter of explanation, you are exempt from this rule. In any case, your face must always be clearly visible.
While this isn’t an official rule, it’s strongly recommended that you choose a colour other than white, as you will otherwise blend into the background. A coloured shirt would make you stand out more and make you more easily recognizable.
Another point worth mentioning is that tank tops, strapless shirts and v-necks are best avoided on passport photos, as you might end up looking naked in the picture. Opt for a piece of clothing with a higher neckline, like a nice shirt or dress, to spare yourself some embarrassing moments.
How to take a passport photo using an online tool
Now that you are familiar with the requirements, it’s time to get to the fun part! Many people choose to go to a photographer or photo booth offering photo prints. However, times change! With so many online tools out there, you can easily create a passport photo on your own, which you can then upload to a photo website. This is by far the easiest and cheapest option out there. For many tools, there’s a service available that can adjust the size and make sure the photo corresponds to the photo requirements needed by your specific country. Afterwards, you can download the photo template and easily get it printed for a cheap price at a drug store or photo booth at Walgreens, Walmart etc.
How do I take a passport picture?
There’s no need to worry if you don’t have a professional camera! Nowadays, smartphone cameras are powerful enough to compete with digital cameras. Whether you choose to take photos with your phone or a digital camera, it’s always helpful to hear some tips on how to take a proper passport photo at home that complies with all the official regulations of the U.S. State Department. You can make your life a lot easier by using a photo tool like Passport Photo Online, which will correctly crop the photo for you and check if it meets the official requirements necessary for the specific countries.
How can I take a passport photo at home?
Take a look at the bullet points below for some tips on how to take a passport photo at home:
- Lighting is crucial for obtaining good results! Your face needs to be well lit, free of shadows and showing natural skin tones. If you opt for taking a photo indoors, be sure to stand facing a window to profit from natural light, as with artificial lighting you can quickly end up having shadows all over your face. Alternatively, you could take your picture outside in a park or the streets. For the time being, you don’t need to worry about the background, you can edit it out later when uploading your photos online and using a passport photo editor.
- Make sure you don’t have strands of hair covering parts of your face, especially your eyes and eyebrows. It’s best to simply tuck it behind your ears.
- The ideal distance to be kept between the applicant and camera is 47.2 inches (1.2 m). The camera needs to be kept at eye level.
- Using a tripod or another object to stabilize your phone can be a great help if you choose to take your passport photo on your own. Your best bet though is to ask a friend, colleague or family member to take a photo of you.
- Other people, objects or animals are not allowed in the photo- you should be the only person depicted in it.
- Your head needs to be centred and held straight.
- Your upper chest and the tops of your shoulders need to be in the photo- if you upload photos of only your head, you are guaranteed to have it declined.
- Think about how to get a proper background for your picture. If you have problems finding a good spot to take photos, you can simply upload them to Passport Photo Online, which will automatically swap your background for a more fitting one.
- You will need to make sure your head stands out clearly from the background. White and off-white backgrounds allow for stark contrasts. You can stand in front of a white wall at home or use a sheet- just be sure to stand half a metre away from your chosen background.
What are the common mistakes you should avoid when taking a passport photo?
If you choose to get your passport photo online using a photo app or a website, it would be good to get to know the most common mistakes when taking a photo. If you keep these in mind, you’ll be sure to get a correct passport photo which is in accordance with all the official government regulations. Avoid the following points:
- You are smiling. Keep a neutral facial expression, so your face is easily recognizable by A.I. tools.
- Your head is tilted at an angle. Keep your head centred with both eyes looking ahead at the lens.
- Your neck and the tops of your shoulders aren’t in the photo.
- You don’t have your eyes open or your mouth closed.
- Red-eye-effect
- Your photo is blurred, has pixels or is out of focus. A photo like this will not be accepted by the government.
- You used filters on your photo. Using a filter and altering your looks in any way is not allowed, as a photo like this needs to represent what you look like in real life. Do not photoshop away a scar or other blemishes.
- The photo you uploaded is in black and white. The official regulations state that passport photos must be taken in colour- any other photo will be rejected.
- The contrast between the applicant and the background is missing. This is why white clothing is not especially suitable, as you risk melting into the background. Dark clothing is better in this case.
- The photo is overexposed or underexposed. Paying attention to proper lighting is extremely important when taking a photo at home. Check out which spot is best lit in your home or take your photos outside.
- You are holding the camera or phone too close to your face. Taking photos that are too close to you will make your face look distorted and unnatural. Pay attention to keeping the correct distance.
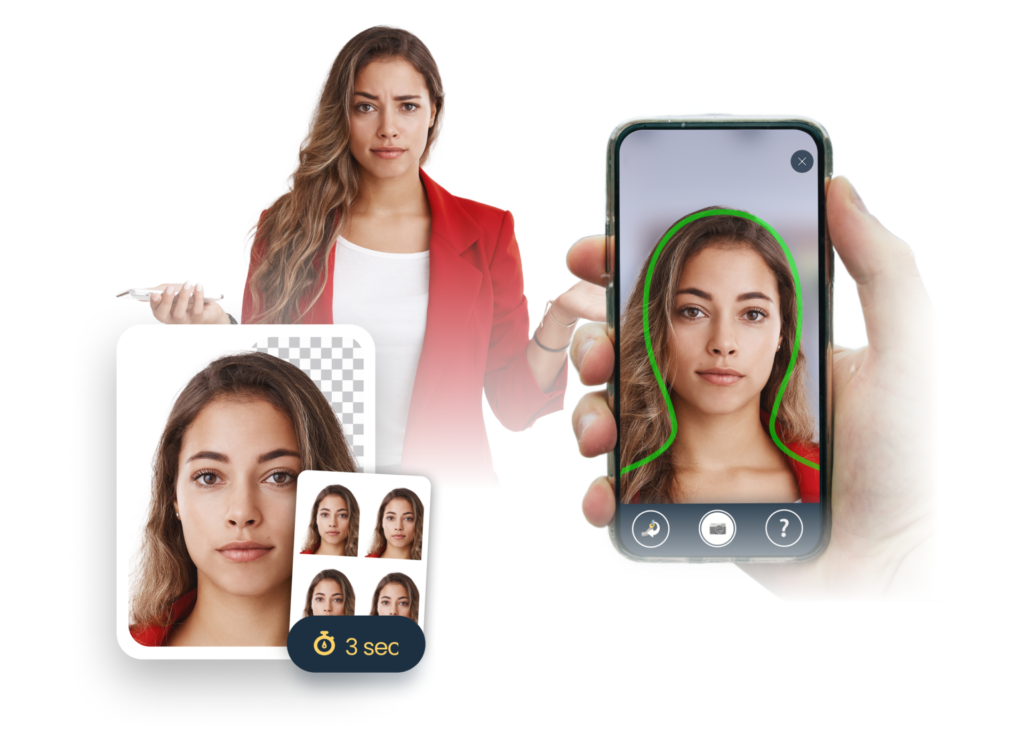
Passport Photo Online Tool
If you choose to get your passport photo online, you can make use of an array of different features offered by apps and websites. This way, you can get your photo in an efficient and less time-consuming way and don’t have to fret about whether you got all the requirements right. Passport Photo Online, for instance, analyses the photo you submit and checks whether the dimensions correspond with those demanded by your country and document type. On top of that, you are free to choose the time, date and place of your photo session. A good photo software always comes with a:
Photo cropper
Should there be anything wrong with the size, the app will adjust it with AI-enhanced tools. There is absolutely no need to convert document photos to a different size on your own.
Background remover
Use it to replace your background with a fitting one that meets the requirement. Thanks to this, it does not matter where you take your photos- you are free to choose!
Passport photo checker
Software programs like Passport Photo Online will analyze whether the photo complies with all the official government regulations. The only thing you need to worry about are the basic guidelines, like keeping your head straight, your eyes open and the hair out of your face. Once the upload is done, the app will create a photo template which you can download instantly for printing it yourself or have a ready print delivered directly to your address.
Download and print your passport photo
Visa, ID card and passport applications often require passport photos 2 x. If you’re satisfied with the result, you can download the image and either get it printed yourself for a low price at a photo booth (Walgreens, Walmart, CVS Pharmacy, Costco, Target, etc.) or choose our direct delivery service if you’re pressed for time.
Some final tips on getting a passport photo online
Don’t leave your photo until the last minute! You save time and money by uploading your photos online and using a professional photo website that provides digital templates for you to download and simply print at a photo booth.