Time for a new passport photo, is it? You’re probably wondering if you should go to a local photographer and take a new photo. Luckily you can stay home for now and worry not because we’ve got your back.
In this blog post, we’ll tell you how to turn a photo into a passport photo. You’ll learn if and how you can do it, as well as find out what tools can assist you in this endeavor. Make yourself comfortable.
Table of Contents
Turning regular photos into passport photos
You can turn a photo into a passport photo all by yourself. Your regular photo will be quite enough, as long as you clearly make out your face to fit into a passport photo.
The bottom line and the good news is that you can convert a normal picture to passport size. Even the one taken with your smartphone will do. Thanks to a variety of software that lets you create a passport photo, you’ll be able to take care of the whole thing via the internet and create passport size photos.
You can open your electronic device and search for a passport photo tool, passport photo editor or a passport photo maker. You will undoubtedly get plenty of options. The internet is full of such software to help you, with hundreds of them offering a passport photo app to turn a regular photo into a passport one.
- Passport Photos at Walmart
- Can You Take Your Own Passport Photo?
- Can You Take a Passport Photo With an iPhone?
- Where Is the Cheapest Place to Get Passport Photos
- What Color Should You Not Wear for a Passport Photo?
- How Can I Convert My Photo to Passport Size for Free?
- Passport Photos Near Me
- Where to Get Passport Photos?
Turning a child’s photo into a passport photo
Just like you can take a photo with your smartphone and then convert it into a valid passport photo, you can create a passport photo for your child the same way.
You just need to find the right moment to snap a perfect photo that will showcase their full face and then get to editing.
Clear the background and change it to white. Use the “Pen” tool to select the child in the photo by drawing carefully around it. Next, proceed to the “Image” menu, where you’ll find “Adjustment” option and under the “Brightness/Contrast” section, you’ll slider you can move to make the background white. Crop the image using the “Lasso” tool and select the face so the head of the infant is shown with their nose in the middle. Be certain that you’ve input the right measurements in the section just above the program’s workspace. When you’re done, proceed to “Imase Size” option, which you’ll find in the upper sections under “File” and write down the correct resolution. Then, find the “Stroke” option under the “Edit” and apply it by slightly resizing the photo with the CTRL +T combination so it fits in the passport photo album you’re about to make. Select “New” from the “File” section and after checking if all the numbers in the box are alright, hit OK. On the newly opened page all you need to do is click SHIFT + F5 and use your newest photo as the pattern. Save it and your child’s passport photo will be ready.
If you remember about passport photo size and other passport photo requirements, you’ll be alright.
As an interesting side note, if we’re talking very young children, you may find it useful that infants are not required to have their eyes fully open in the U.S. passport book.
You might also be interested in:
Can You Take Passport Photos at Home
What Happens If Your Passport Photo Is Rejected

Editing the passport photos
As we’ve already mentioned, you can convert a normal picture to passport size. This rule, of course, has its own regulations stating what would be the best photo to edit into a valid one for a passport application.
After all, you need to make sure that the photo you’ve chosen is possible to edit correctly. Take some time and prepare a variety of pictures you’d be happy with.
Keep in mind that there are a number of rules you should follow, so you don’t have to use additional editing options when using a passport photo converter or another program to create your own passport photo.
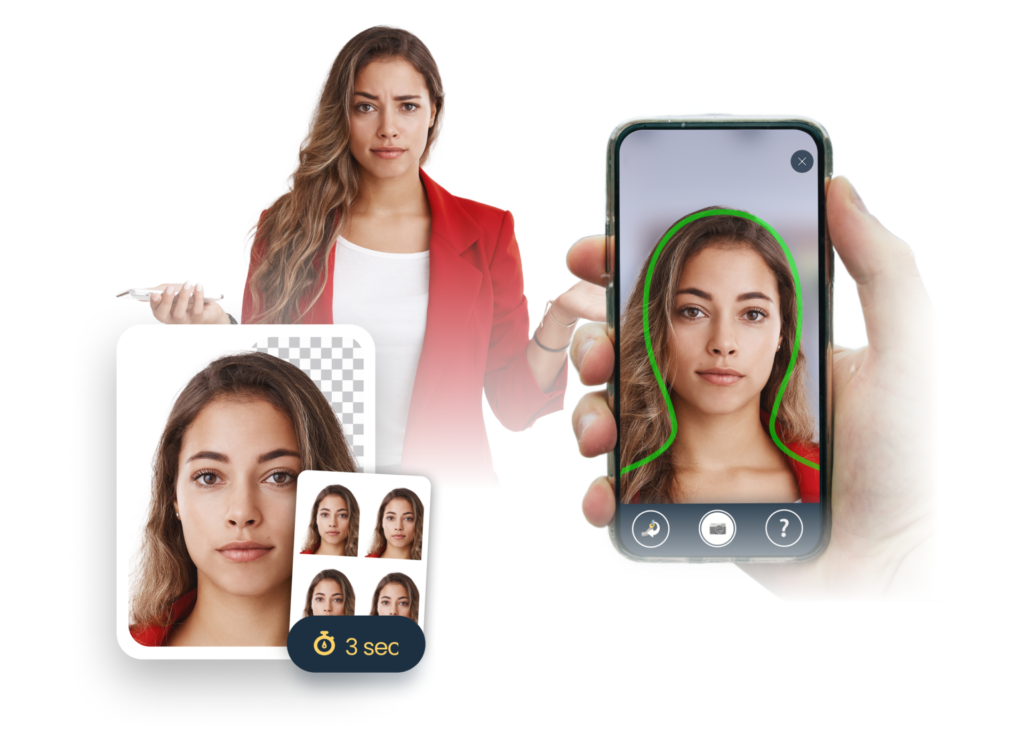
Once you upload the photo and adjust the settings for a U.S. passport photo, the converter will work its magic. Let it work and wait a bit as the AI transforms the picture into a valid passport photo.
Be advised, however, that should the free editor prove ineffective or you might wish to double-check the image, you can turn to other passport editing services or even to the official U.S. government website that allows you to check the validity of the photo.
Changing the passport size
Chances are you will find yourself in need of an internet site or an application that will make sure the photo of your choice fits the required measurements.
Luckily, most passport photo programs or applications have got you covered. Once you input crucial information, confirming what kind of passport photo you need and for the passport book, the artificial intelligence will know what to do.
Should you plan on editing the photo yourself, you need to remember about the right settings. For an American passport photo you will need a photo with the width and length 2 (two) inches long.
Also, remember to input the right resolution for a U.S. passport image. When altering the resolution, you can pick 600 (six hundred) by 600 (six hundred) pixels at minimum. It can, however, go up to 1200 (twelve hundred) by 1200 (twelve hundred) pixels at maximum.
Altering the face position in the passport photo
Your head should cover a bit more of the final photo, to make matters simple. To give you more detailed information, the distance between the bottom of your chin and the top of your head should oscillate between 1 (one) inch and 1 ⅜ ( one and three-eighths) inches.
What you should get as a result is the face covering from 50% (fifty percent) to 69% (sixty-nine percent) of the final image. Adjusting the crop frame requires attention to detail so pay extra attention when attempting to do it alone.
One good point of reference while editing is the fact that your nose is supposed to be the central feature in the final product. Stick to that and you might find the whole process of editing that much easier.
Turning the passport photo background white
The white-colored background is the only option according to the U.S. Passport Information Center, which differs slightly from other countries that sometimes allow light greys too.
That being said, you need to ensure that you edit the background of the photo of your choice and leave it white. Background removal is a standard option in practically every graphical program, so you’ll be okay. Usually, it all comes down to drawing around the object you wish to remain untouched and editing everything else to full brightness. Once everything behind you in the picture is white and no other objects are visible, you’ve all set.
Fixing the lighting in the passport photo
The key role of the passport photo is to showcase your natural self with all the facial features clearly visible. We’re talking moles, freckles, scars and so on and so forth.
Thus, you should ensure that while you’re working on the photo, you also consider applying corrections to lighting to your photos. Work on it carefully and be mindful of overdoing it by accident.
Once you’ve managed to optimize the lighting on the picture, take care of the measurements and the resolution of the image, you’ve succeeded. Now you can print the photos and proceed with your application knowing you’ve completed an important part all by yourself.
Passport photo editors and useful tools
Truly, on the internet, you will find tools to turn a photo into a passport photo online through various applications, websites, and other services. Some of them will allow you to convert a normal picture to passport size for free.
Using them will allow you to save time, save money and will certainly prove to be a very convenient solution as opposed to learning how to edit photos on your own. Be aware, though, that you might still be required to, for instance, create an account on the website to download the passport size photo the program made.
One of these applications, the most popular in the year 2021 according to Statista, is Adobe Photoshop. It will turn out to be a great passport photo creator and if used properly will produce high quality photos.
Be advised that the aforementioned program has a cost, unlike other applications you might find on the internet. While they allow you to convert a normal photo to passport size for free, Photoshop will require paying for its license.
A tool like Passport Photo Online checks if everything is in order, applying all the necessary improvements like removing the background and cropping the picture.
It’s a very easy solution to get a valid passport photo quickly. What’s more, the online application can be used to produce other ID photos. Should you need a photo for a visa, for example, it can be arranged as well.
How to turn your photo into a passport size
To summarize, the picture of your face will be quite enough and you will certainly be able to turn the photo into a passport photo.
If you pay attention to passport photo requirements and then use good programs or applications to create a passport style photo, the final product will definitely be deemed appropriate. So get your best photo, turn it into a passport picture and download it.
FAQ
How to convert a jpg into a passport size photo?
To turn a jpg image into a passport size photo you need to use editing tools to change various aspects of it and stick to the requirements. E.g., 2 (two) by 2 (two) inch size, resolution between 600 (six hundred) pixels by 600 (six hundred) pixels and 1200 (twelve hundred) pixels by 1200 (twelve hundred) pixels.
Can I turn a photo into a passport photo for free?
Yes, you can turn a photo into a passport photo free of charge. What you need to do is find a free website that caters to your needs and upload a picture you wish to see on your new passport. Additionally, if you have a license for Adobe Photoshop, you can turn the picture into a passport photo yourself without spending a penny.
Can I turn a regular photo into a passport photo?
Yes, you can convert a normal picture to a passport size photo. All you need to find is a program or an application on a website that will work on the soon-to-be passport picture you upload. You can use Passport Photo Online to create your U.S. passport photo, for example.

Graduated from the University of Warsaw, Michał, is a travel expert with an undying thirst for adventure and a writer at PhotoAiD. A self-proclaimed book and movie critic as well, he’s always eager to visit to the most underrated or less popular travel destinations.