Are you planning on taking your own passport pictures? Perhaps you’re uncertain how to take a 2×2 passport photo at home? Good thing we’re here to guide you through the process of acquiring passport photos at home.
You’ll learn how exactly to take those passport pictures, how to set the correct size for the passport photo and what kind of passport photo requirements you need to keep an eye on. After you’re done reading this blog post, you will certainly be ready to take your own passport photo at home easily.
Table of Contents
Taking a 2×2 passport photo – what you need to know
A passport photo will be one of the most significant components of your passport application, so you’re right to ask questions, trying to learn all you might need to know. There are rules and regulations that decide whether what you’ve provided will be deemed acceptable at the passport acceptance facilities, and many other useful details you might be interested in.
The most important piece of information is that passport photos can be taken at home, thus requiring no visit to any location offering photo services. You can take the photo yourself, provided you’re confident you’ll manage to stick to all the passport photo requirements.
Additionally, keep in mind that you needn’t arm yourself with the most high-end equipment to snap a perfect photo for the passport, as even a smartphone will do in the end.
A digital camera, however, is still considered your best bet for a passport picture.
- Passport Photos at Walmart
- Can You Take Your Own Passport Photo?
- Can You Take a Passport Photo With an iPhone?
- Where Is the Cheapest Place to Get Passport Photos
- What Color Should You Not Wear for a Passport Photo?
- How Can I Convert My Photo to Passport Size for Free?
- Passport Photos Near Me
- Where to Get Passport Photos?

Taking a 2×2 passport photo at home for a children
Luckily, the rules remain unchanged in this regard and allow you to take your own passport photo as well as your child’s photo in the safety of your house or flat.
Only the youngest, in fact, are allowed a bit of leeway which makes the passport photo taking process slightly more straightforward, but every other aspect remains the same.
Just remember that the bottom line is this: You can take a 2×2 children passport photo at home and the picture that comes out in the end will be perfectly fine and deemed valid at the acceptance facility.
You might also be interested in:
Create your own passport photo at home – Step by step
If you’re looking to take passport photos yourself there are a few things that need sorting out before you begin the photo shoot. You must know that, as it often happens when dealing with such serious matters, proper preparations matter heavily and how thorough you are during them is crucial.
Below you’ll find a detailed guide, giving you step by step instructions, as well as explaining key aspects of the passport photo taking process.
Taking your own 2×2 passport photos – step one
First, a passport applicant needs to really delve into the topic and make sure to do their homework. By homework we mean official guidelines and requirements available on an official, government website. They can give you answers to a vast majority of questions you might have and clarify every doubt in your mind. You should even be able to see photo examples of what a valid passport photo should look like and what not to do in a passport picture.
They include a wide variety of information everyone attempting to take their own passport photos should grasp, ranging from the ideal environment for ID photos for official documents and the more technical side of the passport application, like the right size or format.
- A color photo
- 2×2 inches (51 mm x 51 mm) size
- Photo quality paper (matte or gloss)
- Neutral expression
- Head centered in the photo
- A person staring into the camera directly
- Current appearance in the photo (meaning it cannot be older than 6 months)
- Natural smile that’s not too wide
Keep in mind that there are many other official requirements you must consider when taking the photo on your own and you should familiarize yourself with them if you wish to handle everything on your own.
For example, should you wear glasses, take them off, and especially if they’ve got tinted lenses. Another good advice would be not to use hats or other head coverings in the photo. You can, though, wear it if you’ve got a signed doctor’s statement confirming you need it for medical reasons. Remember to get that signed note when you’re applying for a new passport so the application can go through. Facial piercings can stay as well.
Please note that editing the photo using filters of other effects to make yourself look better is prohibited. Do not digitally change the photo unless you only wish to change size, background or correct color balance.
Taking your own 2×2 passport photos – step two
While you’re reading all about the requirements for your upcoming passport photo you will at one point realize that one should ensure they’ve got a perfect spot for the photo shoot.
To take a passport photo that will pass muster at a passport acceptance facility you need to make sure you’ve created a photography studio-like environment that will make it possible to snap a professional picture.
This is why the second step on your journey should be to pick the right spot in your house or flat and alter it in such a way that the final product will be compliant with all the important rules you’ve read about.
Consider the background and remember that what you need is a plain white one. Ideally, you will be able to just pick a wall that can act as your white background. If you’ve no wall painted white consider hanging a white sheet on it. When done properly, it will be quite satisfactory as your makeshift background.
Another aspect of the passport photo that will no doubt require some adjusting is lighting. The passport picture needs to be properly exposed, meaning that a U.S. passport applicant would have to pay close attention to good lighting and consider whether it is a natural or artificial one highlighting their full face accordingly. After all, a passport picture should accurately showcase a person’s natural appearance, so even a shadow that finds its way to the photo may be enough for the passport photo rejection. Nothing should cast shadows on your image in the photo.
To make sure the photo turns out great you should consider moving furniture and other objects literally out of the picture so your full head is clearly visible. Pay attention to official requirements, follow the rules and you will be able to take pictures like a professional photographer.
Taking your own 2×2 passport photos – step three
You should be aware of the fact that not every attire will do, as they too are covered in the passport photo requirements section. It is another matter to consider, especially since you need to terms with the fact that passport photos aren’t the best occasion to experiment with your style.
Wear casual clothes and avoid overdressing for the part. There is no need to go and grab your new fancy suit or a gorgeous dress. What matters is that your face is fully visible and nothing hides any key features in the passport photo. That is also why certain additional elements like jewelry pieces or piercings technically can stay. All you need to remember is that they shouldn’t hide anything and that’s it.
As a useful side note, be advised that religious clothing including hats or head coverings is allowed, but you will need some form of documentation confirming the compulsion to dress like that.
Taking your own 2×2 passport photos – step four
Once you’re ready and looking forward to the photo you’re about to take, remember to play it safe and take more than one photo. It would certainly be best to take a number of photos to pick from.
Place the digital camera not from your face, remember to stare directly into the lens and take the photo. You can do it thanks to a timer option or simply ask someone else to take the photos. After all, you might want to avoid making silly mistakes like a mid-photo blink, for example, which is another reason to take a number of them. Better safe than sorry, right?
Once you’re done take a good, long look at the passport pictures and choose the ones that seem to be the safest option for a passport application. When that’s done, you can go on and have your passport photos printed.
Do’s and don’ts when taking a 2×2 passport photo at home
As we move on, it would certainly be useful to list a few things you should do when taking your own passport picture as well as a number of things you should be wary of. After all, the process requires a certain attention to detail and planning which, all in all, ends up being quite a number of matters to attend to.
First thing you certainly should think about is turning off the flash setting on your digital camera. In an ideal environment you will have quite enough lighting and you’d surely wish to avoid blinding yourself during the photo shoot.
Second thing is equally as important, and that is, you should take care of the red-eye effect, as it is the only photo alteration that won’t result in photo rejection.
Be absolutely certain you have the right 2×2 inches photo size and double-check it if need be. American passport photos need to be compliant with that measurement, so check it. Luckily most programs on the internet either know exactly how big a U.S. passport photo should be or have easily accessible options to alter the print size.
Fourthly, remember that cropping the photo is best done on a dedicated program or software and even if your camera allows for slight edits, you should place your trust in other applications, websites or programs, like Adobe Lightoom, for example.
Do not, however, retouch the photos as it will make it invalid. Make sure the photo meets all the requirements and that includes being free from any alterations or corrections done in order to look better in the picture.
Also, a damaged photo will not be accepted in passport acceptance facilities, so take good care of them.
Taking 2×2 passport pictures at home – cropping
As you already know, your own passport photo will likely not be ready right after you snap it, since the requirements are rather strict. Hence, the next step on your journey to valid passport pictures is editing.
Before you get passport pictures printed you need to make sure everything checks out, which is why you should turn to websites or programs that will enable you to fix every potential mistake.
You might need to fix the background so it remains white or perhaps you’re in need of a change in size or the proportions so the passport pictures come out printed just right. After all, there’s more to it than just making sure the height and width is correct. Your head size needs to stay within certain limits, meaning 1 -1 3/8 inches (25 – 35 mm).
Luckily there is no shortage of programs that will help you achieve just that, with countless websites claiming to be able to turn a regular photo into a passport photo or professional programs for photography edition. There’s cropping tools aplenty!
To make things even easier, previously mentioned Lightroom even has a special plugin that will allow you to crop the image with almost no effort at all. Photoshop can help you as well. In fact, in most programs cropping the image to match a specific size is a standard function that can be taken advantage of from the starting screen. You just need to find the right box and type in the width and height that interests you.
Just remember that these programs that can help you edit the photo so it remains valid cannot fix certain aspects magically. The photo cannot be digitally edited too much, so you need to pose well for the photo and retain a neutral expression.
DIY: a 2×2 passport photo at home – summary
As you can see, taking the right kind of passport photo and turning it into a 2×2 picture is a process that does require some real effort but it certainly can be done by yourself and without going to a photo studio.
You just need to remember about the U.S. passport photo requirements, create the right environment for the photo, take it and then get to editing.
FAQ
How do I take a passport photo at home?
To take a passport photo at home you need the right kind of space for the photo shoot. It should be well-lit and in front of whatever is supposed to be the white background.
Take the photo with a camera or a smartphone, keeping in mind the rules governing passport photos, and once that’s done, get to cropping the image.
How to take a 2×2 passport photo on an iPhone?
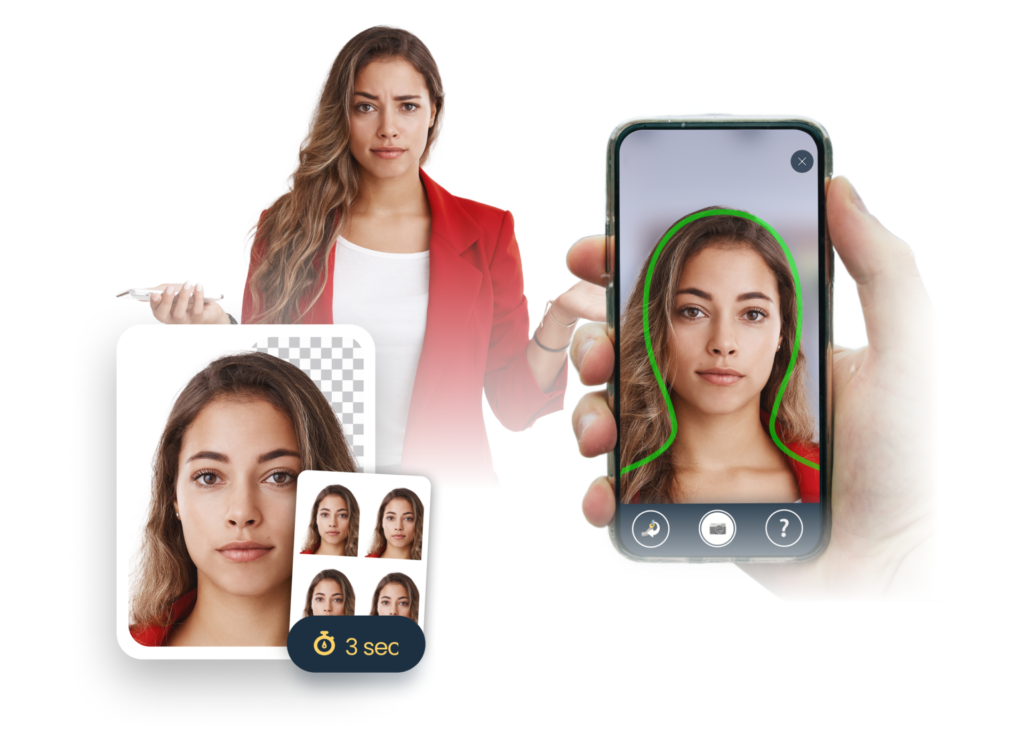
To take a good 2×2 passport photo with your iPhone you should stand roughly 40 (forty) centimeters in front of the camera. Look straight at the phone, trying out your best neutral facial expression.
Remember about the white background and proper lighting and if these two check out, snap away. Once you’ve got the photo, all that’s left is to crop it. You can try your luck with free Internet websites or programs like Gimp, or use others like Adobe Lightroom or Photoshop.
Where to take a 2×2 passport photo for infants?
The best place to take a 2×2 passport photo for an infant would be a bed. Just lay your baby on a white bed sheet. It will act as the perfect background in their first passport picture.
Can I take a 2×2 passport photo on an Android phone?
Yes, you can take a good 2×2 inch passport photo on an Android phone. You just need to make sure to follow guidelines for passport photos and use a cropping tool to alter the image size.
In what setting should I take a 2×2 passport photo?
You must ensure the setting for a 2×2 picture includes a white background and natural and even light. Be certain that nothing can cast shadows on your face in the passport image or its background.

Graduated from the University of Warsaw, Michał, is a travel expert with an undying thirst for adventure and a writer at PhotoAiD. A self-proclaimed book and movie critic as well, he’s always eager to visit to the most underrated or less popular travel destinations.